Python对遥感影像重采样,以及重采样方法 |
您所在的位置:网站首页 › resample python向上采样 › Python对遥感影像重采样,以及重采样方法 |
Python对遥感影像重采样,以及重采样方法
|
首先,本次重采样使用的是GDAL方法完成
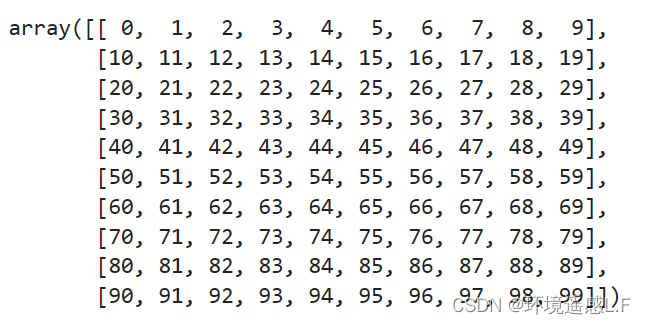
参考了以下博客,并根据自己的需要进行了删改以及原理的探究: 重采样:栅格影像重采样 我使用了下该代码,发现是可行的,但是仍然存在一定的问题,即他的采样方式不是我想要的(最邻近采样,对于采样间隔较大的数据十分不友好),因此又探索了下,在此记录,也方便后续自己再次学习。 再次说明,这个代码不是我写的,原创我找不到,网上大家发布的都是一个代码,我只是对这个代码加了一个参数,然后分析了下!重要参数如下:resample_alg = gdalconst.GRIORA_Average,这个代表的是重采样过程每个重采样后的像元内所有数据求平均,还有双线性插值,最邻近插值等。 from osgeo import gdal, gdalconst import os import numpy as np import glob def resampling(source_file, target_file, scale): """ 影像重采样 :param source_file: 源文件 :param target_file: 输出影像 :param scale: 像元缩放比例 :return: """ dataset = gdal.Open(source_file, gdalconst.GA_ReadOnly) band_count = dataset.RasterCount # 波段数 if band_count == 0 or not scale > 0: print("参数异常") return cols = dataset.RasterXSize # 列数 rows = dataset.RasterYSize # 行数 cols = int(cols * scale) # 计算新的行列数 rows = int(rows * scale) geotrans = list(dataset.GetGeoTransform()) # print(dataset.GetGeoTransform()) # print(geotrans) geotrans[1] = geotrans[1] / scale # 像元宽度变为原来的scale倍 geotrans[5] = geotrans[5] / scale # 像元高度变为原来的scale倍 print(geotrans) if os.path.exists(target_file) and os.path.isfile(target_file): # 如果已存在同名影像 os.remove(target_file) # 则删除之 band1 = dataset.GetRasterBand(1) data_type = band1.DataType target = dataset.GetDriver().Create(target_file, xsize=cols, ysize=rows, bands=band_count, eType=data_type) target.SetProjection(dataset.GetProjection()) # 设置投影坐标 target.SetGeoTransform(geotrans) # 设置地理变换参数 total = band_count + 1 for index in range(1, total): # 读取波段数据 # print("正在写入" + str(index) + "波段") data = dataset.GetRasterBand(index).ReadAsArray(buf_xsize=cols, buf_ysize=rows, resample_alg = gdalconst.GRIORA_Average) out_band = target.GetRasterBand(index) # out_band.SetNoDataValue(dataset.GetRasterBand(index).GetNoDataValue()) out_band.WriteArray(data) # 写入数据到新影像中 out_band.FlushCache() out_band.ComputeBandStats(False) # 计算统计信息 # print("正在写入完成") del dataset del target if __name__ == "__main__": dir_in=r'D:\dataset\ours' dir_out=r'D:\dataset\our_1_average' for file_i in glob.glob(os.path.join(dir_in,'*.tiff')): file_name=os.path.split(file_i)[1] source_file=file_i target_file=os.path.join(dir_out,file_name) resampling(source_file, target_file, scale=0.1) print(file_name) 其他的几个重采样方式关键字: 'GRIORA_Average', 'GRIORA_Bilinear', 'GRIORA_Cubic', 'GRIORA_CubicSpline', 'GRIORA_Gauss', 'GRIORA_Lanczos', 'GRIORA_Mode', 'GRIORA_NearestNeighbour' 下面讲讲这个的平均大概是什么样的方式:原始栅格如下:生成的一个10*10大小的顺序数组
(4+4/2+1/4)代表覆盖的原始像元个数。 |
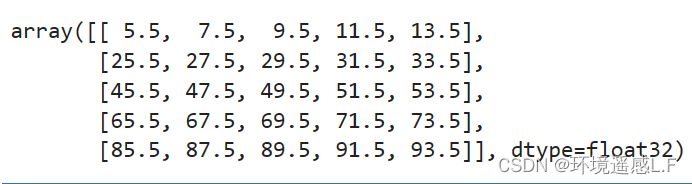 这里我们可以看到:第一个数字5.5 刚好就是(0+1+10+11)/4的结果其他的数据也是对应位置求平均,很好理解。
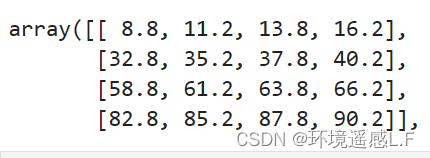 那么这个是怎么计算的呢?以第一个数字为例:他的结果应该是这样,重采样后的像元将原始的前四个像元都是完全包了的(数值为0,1,10,11)然后(数值为2,12,20,21)四个像元都只能包含一半,数值为22的像元只能包含1/4。 所以同理,如果不等分,就是按照原始像元的覆盖率来进行求得平均:这儿的例子来讲: 8.8=((0+1+10+11)+((2+12+20+21)/2)+(22/4))/(4+4/2+1/4) (0+1+10+11)代表四个完整的像元值 (2+12+20+21)四个像元只覆盖了一半,所以他的值应该只算一半 (22)只覆盖了1/4,所以只能算成22/4
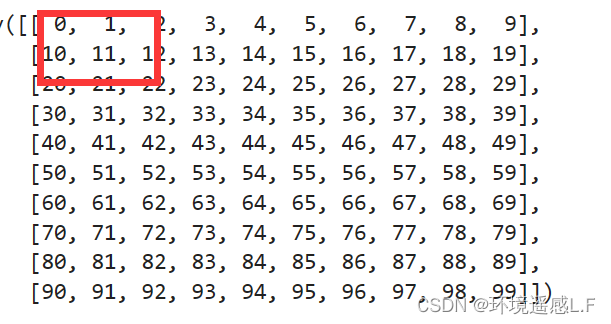
【本文地址】
今日新闻 |
推荐新闻 |